# What is xHashtag?

As a dynamic and fast-paced tech sphere, crypto projects are constantly evolving and innovating to stay relevant to the times. A crypto project can sustain only when it has a strong community that's continuously creating value around the brand, and that's where xHashtag comes in.
xHashtag is a Web3 protocol providing on-chain credentials for Future Of Work. Using reputation credentials, brands can dynamically assemble skilled liquid teams while users are able to build their Web3 reputation and earn in exchange for creating value*.*
# Introduction
xHashtag is a Web3 protocol providing on-chain credentials. Using reputation credentials, brands can dynamically assemble skilled liquid teams while users are able to build their Web3 reputation and earn in exchange for creating value*.*
xHashtag offers 4 key features aimed at boosting every partner Web3 project:
**1) Soultag Credentials**\
**2) Automated Loyalty Program**\
**3) SoulDrops**\
**4) .SOUL Web3 domain names**
xHashtag builds on the strengths of #Web3 projects through the Automated Loyalty Program by helping them build and grow a reliable community, that believe in the project and are willing to back it. In addition to activating the partner project's existing community, xHashtag is also able to mobilize its large user base towards the project, by rewarding them with non-transferable achievement credentials called Soultags for their contribution to the project in terms of task and campaign completion.
The SoulTag SBTs are used as a method of identification which helps in conducting targeted Sybil-resistant airdrops called Souldrops. This would ensure that genuine workers are rewarded aptly for the tasks completed by them, and projects would also benefit from access to unique and targeted participants for their tasks, sans fears of bots, impersonation or duplicity.
Additionally, the launch of .Soul names helps users showcase their SBTs in a single place. The SBTs collected by the user, regardless of the issuer, would be shown directly to the user via the domain link made accessible via our DNS gateway. The domain names ending with “.soul” are minted on Ethereum & Polygon blockchain and are tradeable on Opensea and other marketplaces.
# Key Highlights
* **Soultag Credentials:** Soultags are Skill and Reputation badges minted as Non Transferable Soulbound Tokens
* **Automated Loyalty Program:** Convert loyal users into your brand advocates through incentives in the form of SoulDrops
* **Souldrops:** Filter wallets based on a combination of SBTs and initiate a targeted Sybil-resistant airdrop
* **dotSOUL Web3 Domains:** Showcase your identity & reputation SBTs through .SOUL domain names & SoulPages
# Communities
## #Communities: The Backbone of Web 3.0
Web 3.0 projects rely on communities to unlock conversations that drive project growth and adoption. With many projects coming up on Web 3.0, there is intense competition and pressure on the projects to adhere to timelines and deliver a good product.
What xHashtag does is automate and amplify your community through activities decided by you, while letting you focus on your core aim of creating and building your product.
When several people initiate conversations or complete on-chain activities, other interested people are more likely to take interest & gain confidence in it, and possibly invest or be a part of that project.
However, most Web 3.0 projects are clueless about how to go ahead with planning the right marketing mix. Would high spending translate to better conversions? Would it be better to simply have a large number of airdrops and giveaways on the platform? Or would it be wise to hand over the marketing duties to a specialized agency?
With xHashtag, projects no longer need to worry about these questions.
**As a DAO, xHashtag allows projects to create a #Community where they can:**
* A) Leverage community talents and skill set to accelerate project growth through our automated ambassador program.
* B) Reward users with Soultags that are non-transferable proof of achievement curated onchain.
* **C)** Set token-denominated incentives for the community members who add value to the ecosystem, recognizable on-chain through Soultags, and reward them with fungible tokens or other on-chain incentives such as discounted access to the product.
These communities moving forward would serve as loyal and vital marketing tools for these projects.
# User Groups
The xHashtag DAO ecosystem is divided into **3** major user groups:
* A) Campaign Creators (Web3 projects)
* B) Campaign Participants (xTaggers)
* C) Campaign Reviewers (DAO-approved staked users)
Each of these user groups performs a specific yet important function in the ecosystem. In the next section, we shall look at each one of them in detail.
# Campaign Creators
Any project that requires a boost in its marketing efforts in terms of community growth or project token usage acceleration can utilize the power of xHashtag’s Liquid Micro Teams through a customized campaign suited to their needs.
**Step 1: Set Campaign Objectives**
This outlines the tasks the campaign creator expects the #community or xTaggers to perform.
This could be something as simple as a shout-out on social media or a task to be conducted on-chain on the project’s dApp. The possibilities are virtually endless and campaign creators can fine-tune campaign details to a micro-level.
The campaign creator sets the eligibility criteria, which can include one or more of the following: Previous task performance, user demographics, KYC status, project token staking status etc.
Depending on the outcome they wish to achieve, the creators can define the complexity of the eligibility criteria.
The aforementioned criteria can be automatically enforced by smart contracts that verify the Soultags that an individual holds, thus introducing trust and transparency in a trustless environment.
**Step 2: Funding the Campaign**
In order to do this, the project will have to deposit the planned incentives or rewards into the smart contract. These rewards can be in stablecoins such as USDT or USDC or the project’s native $token.
The smart contract ensures the automatic distribution of funds to the participants of the campaign based on the reward structure set by the project in the smart contract. The project is free to choose how much they want to reward a user for the tasks they complete.
The project can also offer multiplier benefits over pre-defined rewards for the project’s #community users who have staked the project’s $tokens.
Doing so will improve the chances of xTaggers staking your project $tokens to join your community and receive the multiplier bonus on the tasks they complete. This, in turn, helps the project level up through enhanced on-chain participation and off-chain buzz.
# Campaign Participants
As a DAO for the #FutureOfWork, xHashtag offers its users a simple way of earning crypto rewards and Soultags (Onchain Reputation Credential Badges) for completing on-chain and off-chain tasks, with no investment required. The learning curve required to complete these tasks is not very steep, and hence people with basic knowledge of the internet can also participate in these tasks and earn on the platform.
Leveraging the power of what we call Liquid Micro Teams, which essentially are:
A) A flexible task force
B) Available to take tasks from multiple 'employers'
C) Although not technically employees, they perform a similar role
**How tasks work for a user**
Once a user (also referred to as an xTagger) has successfully registered on the platform, they are eligible to receive tasks.
These tasks can be simple tasks such as sharing a tweet or commenting on a Web3 project’s post or conducting an on-chain transaction on their dApp or something more complex like playing a few levels of a game or solving a puzzle.
The type of task, its complexity and the rewards would vary from campaign to campaign, and these parameters would be set by the campaign creator (usually a Web3 project).
**Eligibility of Tasks**
While xHashtag does not restrict the xTaggers on the number of tasks they can perform, the actual task availability and assignment depend on the campaign eligibility criteria set by the creator, enforced via Smart Contracts using Soultag on-chain credentials.
These eligible tasks are not auto-assigned, and require the user to actively accept the task from the available list on their timeline. The UI has been designed keeping simplicity in mind so that even an inexperienced user can easily grasp the workings of the dApp.
**Completion of Tasks**
After accepting a task, the xTaggers are expected to complete it as per the specifications set forth in the campaign outline, within the stipulated time.
Once the task is complete, the user submits it to the on-chain Smart Contract for review. Depending on the type of verification required (automatic or manual review), if there is consensus on successful task completion, and the reward for completing the task, the user will be able to claim rewards directly to his/her wallet.
The process really is that simple, and earning a sizable number of rewards through xHashtag is definitely possible.
# Projects Partners
These are the projects we have collaborated with till date
Access the communities and campaigns of all the projects we have partnered with on our [dApp](https://app.xhashtag.io/#/communities)
# Roadmap
Here's our Roadmap ->
# Tokenomics
**$XTAG** token has a total supply of only 100 million. Here are the other key details you need to know:


# $XTAG Token Utility
**$XTAG is a utility token for DAO Governance on our platform.**
Staking $XTAG tokens on the platform serve three major purposes — Governance, Task Eligibility Prioritization, and Reviewer Status Upgrades.
Staking isn’t mandatory for a casual user who simply wants to participate in campaigns without investing (Yes, that’s possible!)
However, it does offer a host of benefits for the ones who show support by staking tokens.

1. **Participatory Governance**
$XTAG Stakers will be able to vote on any decision to be made on the platform. Users with a higher amount of $XTAG staked would have a stronger influence on the voting power for any proposals to be executed on the platform.
Staking $XTAG allows users access to XDPs — xHashtag Development Proposal. Through this proposal, users can vote in favour of, or against decisions that shape the outcome of the DAO. A majority approval in terms of voting would be required for a proposal to be accepted and implemented.
2. **Task Eligibility Prioritization**
Users who have staked $XTAG will have an edge over non-staked users, as they are given an opportunity to complete tasks before others. Thus, their chances of being able to participate in the campaign and winning rewards are higher than others.
3. **Upgradation to Task Reviewer Status**
Staked users on our platform would also be to able review tasks submitted by other users which gives them an opportunity to earn more and also make sure that there are no bots/fake participation.
4. **Special Whitelist Allocation**\
Holders of XTAG get access to a special pool for our campaigns with partner projects, enabling a higher chance of getting rewards. Holding value requirements differ from campaign to campaign, but are usually within the range of $10-30 worth of XTAG.
# Soultag SBTs
### What is a Soultag?
A Soultag is a unique, non-transferable Soul Bound Token (SBT) that is as an onchain credential for reputation building and skill certification for an individual or a soul. Over time this becomes a means of identifying and verifying a soul’s reputation and skills.
Soultags are presently divided into two broad categories - Skill-based and Reputation-based.
Skill-based Soultags showcase your proficiency in completing a particular type of task, set of tasks or genre of work, whereas Reputation-based Soultags are a measure of how many times you’ve successfully used your skill to efficiently complete these tasks.
By levelling up your Skills through earning more Reputation-based Soultags, you can open up many more opportunities and possibilities. Simply put, the more the number of completed tasks and correspondingly the Soultags you receive, the more the reputation and the higher the reward. Additionally, certain tasks might have eligibility requirements of holding previously provisioned Soultags, so make sure you participate in as many tasks as possible.
### How can I obtain a Soultag?
Soultags are offered by xHashtag from time to time, either in partnership with other #Web3 projects for the completion of certain tasks or campaigns or to mark a special event, occasion or task. Essentially, it enables our vision for the Future of Work, letting users record their achievements on-chain through the completion of skill and reputation-based tasks.
As proof of identity, completion and mastery, Soultags are in most cases free, apart from a negligibly small gas fee for minting the Soultag SBT.
Claiming Soultags is pretty simple and straightforward. [A guide can be found here.](https://medium.com/xhashtag/xunicorn-soulswag-is-coming-soon-heres-all-you-need-to-know-b5b3708f3339)
You can have more than one Soultag in your wallet, but a particular Soultag can be collected by one individual only once.
### How to view your claimed Soultags?
Viewing all the Soultags you have collected over a period of time is easy. You simply need to navigate to your profile on the xHashtag dApp and click on the My Soultags button, and all your Soultags collected across various EVM chains would be visible.
For a step-by-step guide, [click here](http://tinyurl.com/ViewSoulSwag).
All the SBTs in your wallet can also be viewed through **Soulpage**. To do this visit your SoulPage by adding ‘.page’ at the end of your registered .SOUL domain. For example, if you have registered ‘example.soul’, you can access your SoulPage by going to ‘[**example.soul.page**](https://example.soul.page/)’ via any browser, without any additional plugins or settings.
### Why claim Soultags?
**Influence** — Soultag SBTs contribute towards building your onchain Web3 reputation, acting as a measure of credibility, which can help you become an ambassador for Web3 projects.
**Opportunity** — It opens up possibilities for further rewards, by means of selective or preferential access to future xHashtag campaigns as well as remote jobs that projects may create for liquid teams, based on the Soultags you possess.
**Pride** — As the tokens are non-transferable, you will forever have the privilege and pride of having unlocked an achievement. Also, as these tokens are unique, and issued only on completion of a certain activity in a certain period of time, the rarity factor is an added bonus!
### What is a Souldrop?
Presently airdrops are plagued by bots and fake profiles, who end up claiming rewards meant for genuine fans and community members, thus causing avoidable loss of finances and reputation for Web3 projects.
Souldrops are an evolution to airdrops, where users who add real value to a project over a prolonged period of time are recognized and rewarded aptly for their efforts while eliminating bots and malicious actors.
Souldrops help bring the community together by encouraging genuine users to add value to the project, while also creating a paradigm for the future of work.
### How can Soultags help me earn?
While Soultags in itself does not have any financial, transactional or monetary value, it opens up doors to many opportunities for the holder.
Akin to a certification in the real world, the value generation is immense, where people having the necessary skill and reputation Soultags would be chosen by projects to complete ambassador tasks, or even larger tasks having better payout.
As such, it is ideal to collect as many Soultags as you can, while the Web3 identity space is still nascent, allowing you to capitalize on micro tasks and improve your earning potential.
# Introducing .Soul Domains!
In line with our mission of building an ecosystem around Soulbound Tokens, we identified a need for users to showcase their reputation accumulated across Web3 in one single place. This resulted in the launch of the most essential part of the Soulbound reputation journey, the Soul Names (yourname.soul domains)!
**What are Soul Names?**
Soul names are a humanly readable naming service that can map commonly used words, phrases, or terms to a crypto wallet address, which consists of obfuscated numbers and characters. This makes it super easy for you to remember and share your wallet address with others.
These domain names ending with “.soul” are minted on the Ethereum blockchain and will be tradeable on Opensea and other marketplaces. By default, the Soul domain would be resolved to the user’s connected wallet.
**How Soul Names work as Web3 Domains**
Soul Names would be made accessible via our DNS gateway, accessible via popular internet browsers including Google Chrome and Brave without additional configuration or plugins.
Thus, all the SBTs collected by the user, regardless of the issuer, would be shown directly to the user via the domain link. In addition to this, the user will have the ability to configure and link other wallets and pages as the ecosystem around Soul Domains grows and develops.
*On the next page, you can check out the utilities and pricing structure of Soul Names.*
# Utilities of .Soul Domains
On the Web3 space, Soul Names have a number of utilities, which are constantly evolving as the ecosystem grows.
**Here are some of the key utilities of your lifetime free, transferable .Soul domain name:**
* An easy reference to your complex wallet address
* Compatible with all kinds of SBTs, they allow a single point of access to a user’s Web3 reputation
* Unlock special access to smart contracts based on the user’s aggregated reputation
* An identification mechanism on the xHashtag dApp
* Compatible with a number of wallets and addresses
* As they are Ethereum-based, they can be traded on NFT exchanges such as OpenSea
* They can be used in conjunction with xHashtag’s Soul Page
# Pricing Schedule for SoulNames
All Soul Names come with a one-time minting fee, and are available for use or transfer free of cost for a lifetime, with no annual or recurring charges.
Below is the one-time fee schedule for registering a .SOUL domain. There’s no renewal fee and once you register the domain, it’ll be yours forever.
xHashtag Soul Names Fee Schedule
# Soul Name Contract Details
### **Ethereum**
Soul Names Contract Address: \
[0x1D92C7ce55E1bB0a0946ea284D79210D6161185f](https://etherscan.io/address/0x1D92C7ce55E1bB0a0946ea284D79210D6161185f)
Marketplace**:** \
[Opensea](https://opensea.io/collection/soul-names)
### Polygon
Soul Names Contract Address:\
[0x1D92C7ce55E1bB0a0946ea284D79210D6161185f](https://polygonscan.com/address/0x1d92c7ce55e1bb0a0946ea284d79210d6161185f)
Marketplace**:** \
[Opensea](https://opensea.io/collection/soul-names-v2)
# Showcase your Soul with SoulPages!
Soulpages are essentially the future of Web3 identity, with every user being provided with a unique .soul domain that they can call their own.
You’ll now be able to register your very own domain, say *defidaniel.soul* or *degendaisy.soul*, which would be a living, dynamic profile of your achievements, skills and digital reputation acquired over time, based on your Web3 activities.
Additionally, we’re enabling traditional DNS access to these domains via .page. For example, if a Soulname is called example.soul, it would be easily accessible through [example.soul.page](https://example.soul.page). So defidaniel.soul would be accessible on [defidaniel.soul.page](https://defidaniel.soul.page) via any standard browser like Google Chrome, Firefox etc.
### **Contents of your SoulPage**
Your SoulPage would contain all of your available credentials collated in one place. This includes your off-chain achievements recorded in the form of Soultag SBTs, as well as on-chain reputation through Soultags as well as the ones received from other projects.
The entire process is dynamic and automated, with no user intervention required post-setup. All you need to do to set up your very own SoulPage is mint the Soul domain token as an NFT into your wallet, and voila, once you visit the .soul page, all your SBTs from your wallet will instantly show up.
**Why have a SoulPage?**
Having a SoulPage comes with loads of benefits:
* You get access to your unique, shareable credentials page, which acts as a portfolio that you can showcase to the world.
* You can easily keep track of all your badges collected over time, including reputation badges, attendance badges, allegiance badges and skill badges.
* You can share your credentials page with anyone easily through the link, which also makes for a great addition to your social media bio.
* Aggregated rankings and a leaderboard for all domains having SBTs will ensure high performers and regular adopters get greater preference for upcoming projects, campaigns or tasks.
# SoulRank for Comprehensive Credibility
To Be Updated Soon
# Contract Addresses
## XTAG on Solana
This is the Native XTAG, SPL token, first deployed on the Solana blockchain\
*Contract:*[ *5gs8nf4wojB5EXgDUWNLwXpknzgV2YWDhveAeBZpVLbp*](https://solscan.io/token/5gs8nf4wojB5EXgDUWNLwXpknzgV2YWDhveAeBZpVLbp)
## XTAG on Bitcoin (BRC-20)
XTAG BRC-20 token on Bitcoin Chain:\
*Contract:*[ ](https://solscan.io/token/5gs8nf4wojB5EXgDUWNLwXpknzgV2YWDhveAeBZpVLbp)[57f1e2ba8ed8405670bc928e7a35f0810c472be2fdd6fc91748fb3d14b12d21bi0](https://ordinalswallet.com/inscription/57f1e2ba8ed8405670bc928e7a35f0810c472be2fdd6fc91748fb3d14b12d21bi0)
## Avalanche
**Wormhole XTAG / wXTAG Avalanche C-Chain:**\
*Contract:* [*0xA608D79C5f695C0D4C0E773A4938b57e18e0fc57*](https://snowtrace.io/address/0xA608D79C5f695C0D4C0E773A4938b57e18e0fc57)
**Native XTAG / XTAG**\
*Contract:*[ *0x06ba3e871ae3c14026d3e8a819fb3b5f31fef1d3*](https://snowtrace.io/address/0x06ba3e871ae3c14026d3e8a819fb3b5f31fef1d3)
**XTAGWrapper**\
*Contract:*[ ](https://snowtrace.io/address/0x06ba3e871ae3c14026d3e8a819fb3b5f31fef1d3)[*0x9405214FE89cC0D098cF8880B887bbb5135684EC*](https://snowtrace.io/address/0x9405214fe89cc0d098cf8880b887bbb5135684ec)
**Liquid Staked XTAG / sXTAG**\
*Contract:*[ *0x728f28819d0eFE48c82161ADd29f42b1eb5d8dbd*](https://snowtrace.io/address/0x728f28819d0eFE48c82161ADd29f42b1eb5d8dbd)
## Polygon
**Wormhole XTAG / wXTAG**\
*Contract:* [0x326b0D4D36dEeDD179D06D00388913E63A54e2b9](https://polygonscan.com/token/0x326b0D4D36dEeDD179D06D00388913E63A54e2b9)
**Native XTAG / XTAG**\
*Contract:* [*0x70278210782Cd535E5255462e8CE710b0E085EAC*](https://polygonscan.com/token/0x70278210782Cd535E5255462e8CE710b0E085EAC)\
\
**XTAGWrapper**\
*Contract:* [*0xd657FC315D4ec57ec333c1b47C7267B0228fE874*](https://polygonscan.com/address/0xd657FC315D4ec57ec333c1b47C7267B0228fE874)
# IDO
#### All You Need to Know about the xHashtag IDO on SolRazr
* Token: **XTAG**
* Accepted: **USDC (SPL Token)**
* IDO Token Price: **$0.25**
* Total IDO Pool size: **$250,000**
* SolRazr Community Pool Size: **$200,000**(Requires $SOLR to be staked)
* Allocation Amount: **$200**
* This is only open for those who have staked $SOLR. [Stake NOW!](https://www.solrazr.com/staking)
* Open Community Pool Size: **$50,000**
* Allocation Amount: **$50**
* Requires **3 SOLR** (\~$10) to be held from whitelist opening until the end of IDO.
#### Things to Keep in Mind:
* Blockchain: **Solana**
* Launchpad:[ **SolRazr**](https://www.solrazr.com)
* Platform: **Desktop and Mobile**
* Supported Wallets: **Solflare and Phantom Wallet**
* Is KYC required for participation in IDO? **Yes**
* IDO vesting terms:
* 30% unlocked on TGE
* 30% unlocked each month over the next two months
* 10% on the 4th month
#### Key Dates for the xHashtag IDO on SolRazr:
* Application for whitelist registration for the IDO opens on **November 10th at 2 PM UTC**
* Whitelist registration closes on **November 14th at 2 PM UTC**
* Lottery Winners are announced and KYC opens on **November 17th at 2 PM UTC**
* KYC closes on **November 21st at 2 PM UTC**
* Final winners (KYC verified) are announced on **November 22nd at 2 PM UTC**
* Whitelist Winners announcement on **November 26th at 2 PM UTC**
* IDO opens on **November 26th at 2 PM UTC**
* IDO closes on **November 27th at 2 PM UTC**
* Token Distribution: **December 30th at 2 PM UTC**
**For further details, click** [**here**](https://medium.com/@SolRazr_App/xhashtag-ido-participation-status-and-kyc-guide-7ab3f71fe383)**.**
# Viewing Soultags using Soulpage
Soul pages are the future of Web3 reputation, where all your collected SBT credentials are displayed. The Soul page is a living, dynamic profile that showcases your achievements, skills and digital reputation acquired from all the popular issuers of Soulbound Tokens across Web3.
If you own a .soul domain, say **genesisone.soul**, the corresponding SoulPage for that wallet can be accessed by appending .page, which would be [genesisone.soul.page](https://genesisone.soul.page/) in our example, accessible via popular internet browsers including Google Chrome and Brave without additional configuration or plugins.
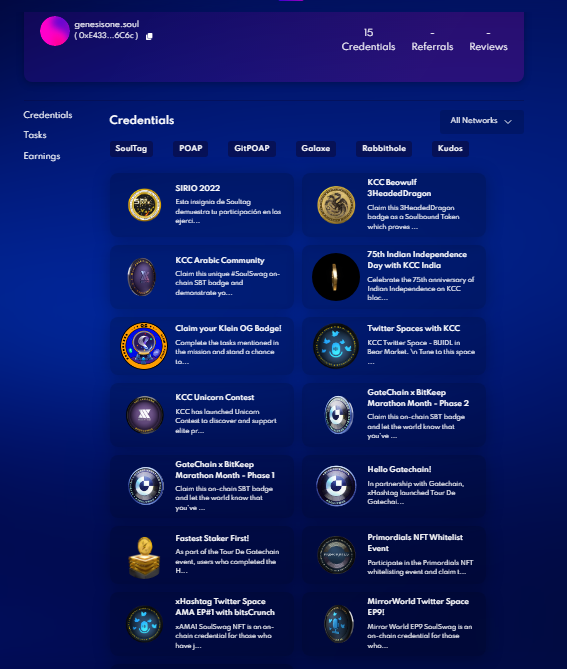
Once you claim your .SOUL name from your wallet, no additional user intervention is required to set up your SoulPage.
# Viewing Claimed Soultags using Metamask Mobile App
Claimed your own Soultag already but not sure how to view it? Worry not! This simple guide will have you up and running in no time. So let’s get right into it.
**Step 1: Find the Soultag Contract Address and Token ID**
In order to view any Soultag SBT, you will need to have its contract address and token id. To obtain this, you will need to go to the respective block explorer (For example, snowtrace.io for Avalanche chain, explorer.kcc.io for KCC and so on)
The required details will be found under the corresponding mint transaction of the NFT (or in this case, the Soultag SBT). Note down the contract address and token ID, which would be needed later.
\
**Step 2: Set up the Metamask mobile app on your phone**
In case you haven’t installed it already, download and set up your Metamask mobile application. Note that you would need to add the respective chain where you have claimed your Soultag to the Metamask wallet using the inbuilt browser.
\
To add a chain to Metamask wallet, select the Browser option from the left dropdown menu and head over to chainlist.org. Choose the appropriate chain by scrolling down and searching for the desired chain.


Approve all notifications and press Add to Metamask. Make sure you Switch to the New Network.


Exit the Browser by switching to your Wallet by using the left dropdown menu like earlier.
**Step 3: Import the NFT/SBT**
Once you have selected the appropriate network, head over to the NFT tab on your Metamask app, and press ‘Import NFT’. Enter the contract address and the token ID which you had noted previously and press Import.

**Note:** *You need to enter the Contract Address of the NFT/SBT and not your personal Metamask Wallet Address. If you use your personal Metamask wallet address, you will be prompted as below.*

Once imported, you will now be able to view the Soultag SBTs in your Metamask Mobile Wallet under the NFT section of the respective chain.

You will need to repeat this procedure for all your claimed Soultags in order to be able to see all the badges.

If you have any queries, do not hesitate to reach out to us over Telegram or any other [social medium](http://linktr.ee/xhashtag).
# Registering .SOUL Domain Name on Polygon Layer 2
The process of minting a Soul Domain is simple and straightforward.
**STEP 1:** Visit [app.xhashtag.io](https://app.xhashtag.io/) where you’ll be prompted to enter your desired name for the .SOUL domain as shown in the screenshot below.
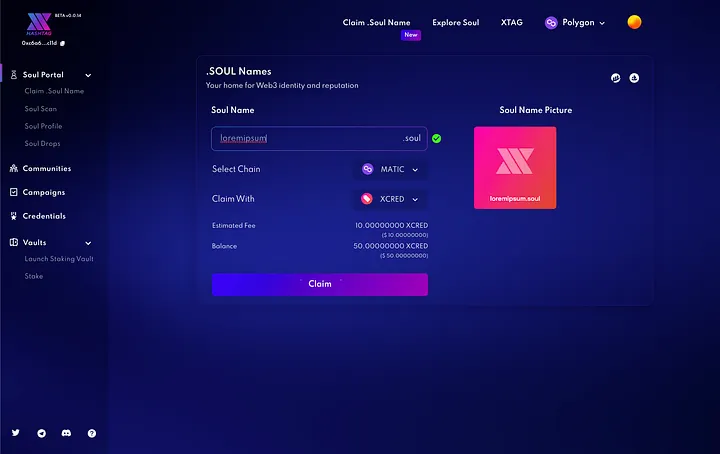
**STEP 2:** Click on the **Claim** button and confirm the transaction on your wallet.
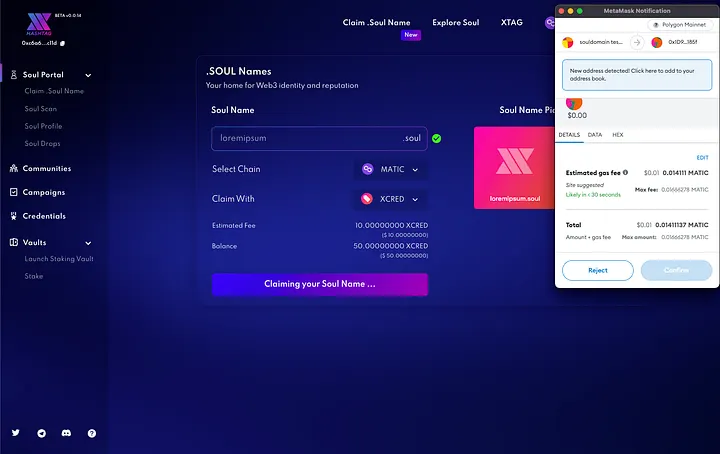
Once the transaction is confirmed, the Soul Domain is officially yours for life, with no renewal fees.
**STEP 3:** See your .SOUL Domain in action
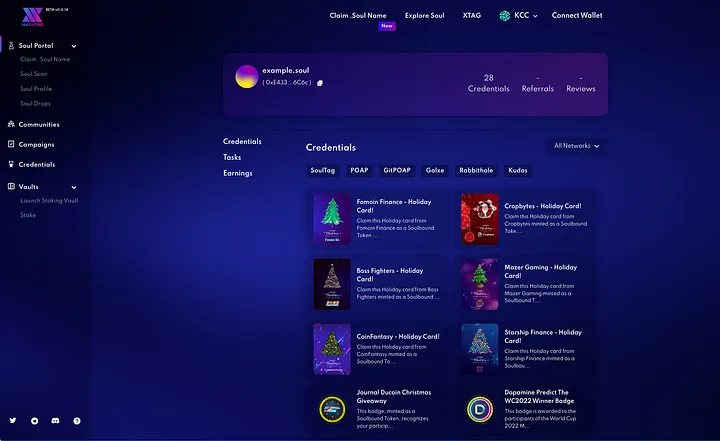
The launch of Soul Domains on Polygon Layer 2 is just the beginning for xHashtag. We are continuously working on new and innovative ways to improve the user experience and provide our community with the tools they need to succeed in the decentralized world.
# How to Buy $XTAG
Our native token of the xHashtag dApp, $XTAG, is a token with several utilities. It is available for purchase from the open market on a number of CEXs and DEXs, out of which we have officially been listed on KuCoin, Gate.io, Raydium and TraderJoe.
Buying $XTAG on centralized exchanges is pretty straightforward and easy. You simply need to navigate to the available XTAG-pair of your choice and swap the other pair token for the desired amount of XTAG at the prevailing rates. For example, on the XTAG-USDC pair, you simply need to enter the amount of XTAG you require and pay the corresponding amount in USDC.
**You can acquire XTAG on KuCoin, Gate.io, Raydium and TraderJoe.**
KuCoin\
Gate.io \
Raydium on Solana:\
\
\
TraderJoe on Avalanche:\
# A Guide to Buy XTAG on KuCoin
**You can buy XTAG on KuCoin by following four simple steps:**
**Step 1:** Register an Exchange Account on KuCoin
First, you need to register an account on KuCoin. Registering an exchange account is a straightforward process, and it should only take a couple of minutes. You can register on KuCoin by clicking [this link](https://www.kucoin.com/ucenter/signup?spm=kcWeb.B1homepage.register.1).

**Step 2:** Deposit Funds into your Account
There are two ways that you can fund your account:
A) You can use other cryptocurrencies that you are currently holding to exchange them for XTAG.
B) You can make deposits in fiat currency using a credit or a debit card. You can also link your bank account and select the amount you would like to deposit.
Note that you may need to complete your KYC if not done earlier.

**Step 3:** Buy XTAG
The third step is actually buying XTAG tokens. To do this, you simply have to go to KuCoin’s trading section where you can place an order. Enter the amount of USDT that you want to exchange for XTAG. Confirm your transaction details, and in just a few minutes, you will receive the tokens in your KuCoin account.

You can directly visit the XTAG-USDT trading pair page on KuCoin by clicking [this link](https://www.kucoin.com/trade/XTAG-USDT).
**Step 4:** Store in a Crypto Wallet
After buying XTAG on KuCoin, you need a place where you can store them safely.
If you are a trader, the best option for you is to store your tokens somewhere where you can access and utilize them easily. However, if you want to hold the tokens rather than trading or utilizing them in some other way, you may consider hardware or offline wallets, which offer lesser functionality in exchange for more safety.
# Bridge XTAG
# Bridging XTAG to Solana
xTaggers, here's a detailed guide on how you can bridge your Avalanche Native XTAG back to Solana Native XTAG using Wormhole Portal Bridge.
**$XTAG Contract Address on Avalanche:** 0xA608D79C5f695C0D4C0E773A4938b57e18e0fc57
**$XTAG Contract Address on Solana:** 5gs8nf4wojB5EXgDUWNLwXpknzgV2YWDhveAeBZpVLbp
Before you start the process of bridging, make sure you have your Solana Wallet (Sollet/Phantom/Solflare/Mathwallet) and MetaMask Wallet (Configured for Avalanche Mainnet C-Chain) set up and ready to send/receive funds. Here’s how you can go to chainlist.org and add Avalanche Mainnet to your Metamask.

Bridging your Avalanche Native XTAG to Solana Native XTAG is a pretty simple process, and following the below steps will help you successfully complete the bridging with no issues whatsoever.
Before you bridge XTAG from Avalanche to Solana using Wormhole Portal Bridge, you would need to ensure that the tokens are properly wrapped.
The steps below will guide you on how you can bridge them in a few simple steps. Let us begin:
**Step 1: Wrap your existing Avalanche Native XTAG**
The wrapping process is similar to how you would have first brought in XTAG from Solana to Avalanche. Let us take a look at how the converse works.
***1a. Visit app.xhashtag.io and make sure you select the Avalanche Mainnet***
You first need to be on the Avalanche network to be able to wrap/unwrap tokens.

***1b. Connect your MetaMask Wallet, and accept all the pop-up notifications.***
In case any MetaMask notification pops up, accept it to make sure the wrapping process functions as intended.
***1c. Select Wrap/Unwrap from the top panel***
Once you are connected to the Avalanche network, you will see a Wrap/Unwrap button on the top panel. Click on it.

***1d. Choose Wrap as the mode***
Ensure that you are on the Wrap mode by using the arrow icon to switch between modes.

***1e. Enter the desired amount, press approve and confirm***
The Balance you have in XTAG would be shown at the top right corner of this pane. Enter the amount of XTAG you wish to wrap. Press MAX if you want to wrap all your available XTAG.
Choose approve (first time only) to approve the transaction on MetaMask. Accept any pop-up notifications. Press Wrap and accept all pop-ups again.
You should now have the corresponding amount of wXTAG, which may appear as (a wormhole) in your wallet.
**Step 2: Bridging the Wormhole XTAG to Solana**
Once you have wrapped your Avalanche Native XTAG as Wormhole XTAG, you can now bridge it to Solana using PortalBridge.
***2a. Visit PortalBridge and enter the details***
Go to [www.portalbridge.com](http://www.portalbridge.com) and choose Source as Avalanche and Target as Solana.

***2b. Connect your MetaMask Wallet in the source step and press next***
Connect your wallet and accept any pop-ups that appear.
***2c. Select the amount of XTAG you wish to bridge***
Once you have selected the wallet and pressed the Connect button, you should now see the ‘Select A Token’ dropdown. Press it, and you will be able to view your wallet’s available tokens and the corresponding balance.

Choose XTAG (or enter this contract address: 0xA608D79C5f695C0D4C0E773A4938b57e18e0fc57).
Select the desired amount you wish to bridge, and press Next.
***2d. Connect your Solana wallet***
In the target column, connect the Solana wallet of your choice (Sollet, Phantom, Solflare etc.) and press next.

***2e. Send Tokens through the bridge***
Double-check all the details shown on the screen and press Approve. Don’t forget to accept all pop-up notifications from your wallet. Wait for the process to complete.

Now press Transfer. Approve all pop-ups. Do not navigate away from the page at any point in time.

Wait for the transactions to confirm.

***2f. Press Redeem to get the Solana Native XTAG in your wallet***

Once the process is complete, you will see a transaction successful message, and the balance should reflect in your Solana wallet in a while, with the contract address: 5gs8nf4wojB5EXgDUWNLwXpknzgV2YWDhveAeBZpVLbp.

**Note:** To view and confirm all the valid contract addresses, click [here](https://docs.xhashtag.io/guides/contract-addresses).
**Important:** Kucoin and Gate.io currently only support deposits for Solana Native XTAG with contract address 5gs8nf4wojB5EXgDUWNLwXpknzgV2YWDhveAeBZpVLbp.
That’s it! You’ve successfully bridged over from Solana to Avalanche.
# Bridging XTAG to Avalanche
xTaggers, the moment you have all been waiting for is here. Starting today, 21st February 2022, you will be able to move your XTAG to the Avalanche network from Solana using the Wormhole Bridge.
**$XTAG Contract Address on Solana:** \
[5gs8nf4wojB5EXgDUWNLwXpknzgV2YWDhveAeBZpVLbp](https://solscan.io/token/5gs8nf4wojB5EXgDUWNLwXpknzgV2YWDhveAeBZpVLbp)
**$Wormhole XTAG Contract Address on Avalanche:** [0xA608D79C5f695C0D4C0E773A4938b57e18e0fc57](https://snowtrace.io/token/0xA608D79C5f695C0D4C0E773A4938b57e18e0fc57)\
\
**$Native XTAG Contract Address on Avalanche:**\
[0x06ba3e871ae3c14026d3e8a819fb3b5f31fef1d3](https://snowtrace.io/address/0x06ba3e871ae3c14026d3e8a819fb3b5f31fef1d3)
### Part 1 - Bridging from Solana XTAG to Wormhole XTAG
Before you start the process of bridging, make sure you have your Solana Wallet (Sollet/Phantom/Solflare/Mathwallet) and MetaMask Wallet (Configured for Avalanche Mainnet C-Chain) set up and ready to send/receive funds. Here’s how you can go to chainlist.org and add Avalanche Mainnet to your Metamask.

The steps below will guide you on how you can bridge them in a few simple steps. Let us begin:
**Step 1: Open the Wormhole Bridge Portal**
Visit the Wormhole PortalBridge at [https://portalbridge.com/](https://portalbridge.com/#/transfer). Make sure you are using the correct website address to prevent malicious attempts by scammers. Select Solana as the source network and Avalanche as the target network.

**Step 2: Select and Connect a Source Wallet**

Choose your source wallet that has XTAG in it. This can be either Sollet, Phantom, Solflare or Mathwallet, as currently supported by Wormhole Bridge. Click on the “Connect” button on your Solana wallet popup.
**Step 3: Select the XTAG token and the transfer amount**
Once you have selected the wallet and pressed the Connect button, you should now see the ‘Select A Token’ dropdown. Press it, and you will be able to view your wallet’s available tokens and the corresponding balance. Choose XTAG, select the desired amount you wish to bridge, and press Next.

**Step 4: Connect to the MetaMask wallet**

On the Target network page, make sure it shows Avalanche, and press Connect Wallet. You will now receive a MetaMask pop-up. Click Next. You should now be able to see your MetaMask wallet address, and the bridged tokens you would be receiving. Press Next to move to the next step.
**Step 5: Send the Tokens**
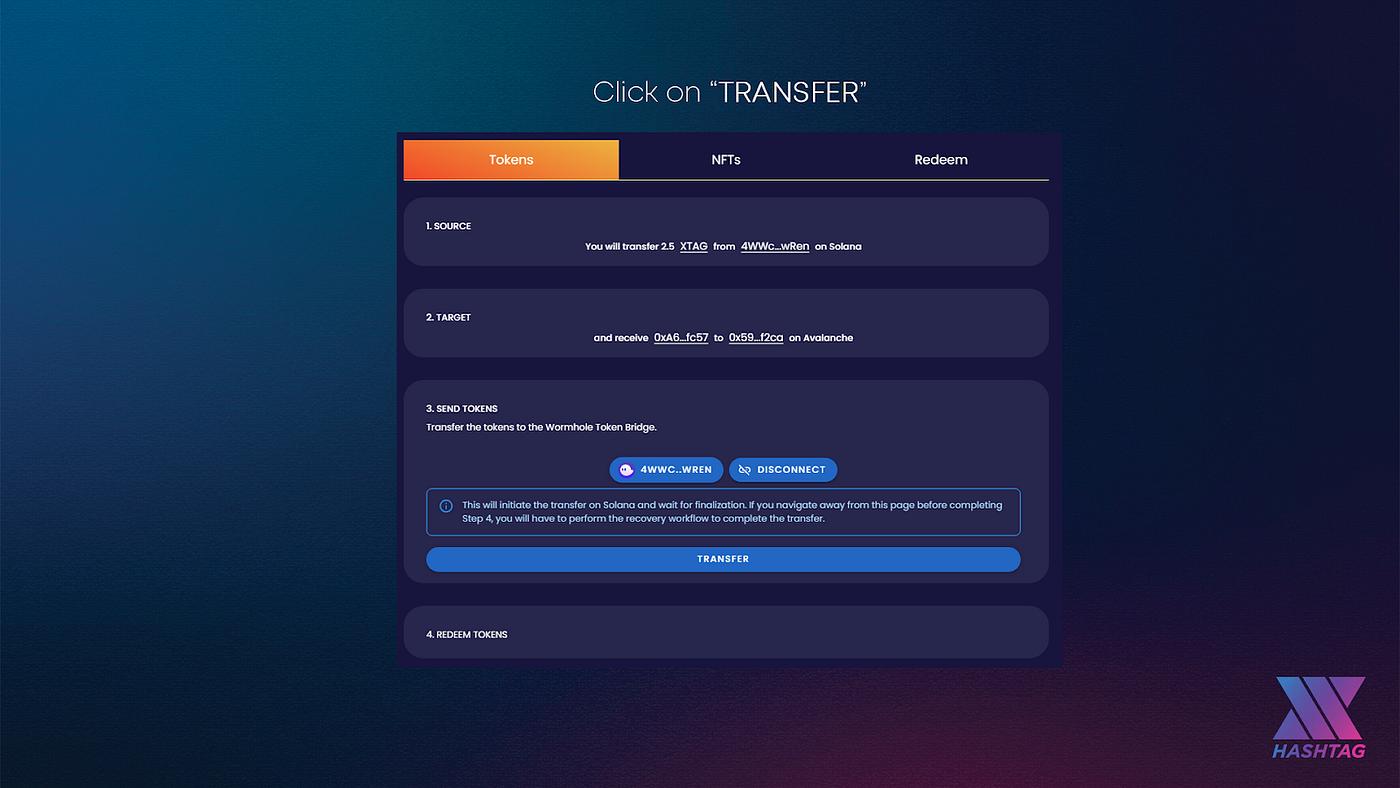
Initiate the transfer by pressing the Transfer button. Press Confirm. The transfer process will now begin. You may have to press Approve multiple times on your Solana wallet. Do not navigate away from the page till the tokens are Sent. You would incur a small amount of gas fees in $SOL.
**Step 6: Redeem the Tokens**

Redeem the Tokens on the Avalanche network by pressing Redeem. You may incur a small amount denominated in AVAX for network gas fees. Next, click on Confirm on the MetaMask pop-up screen. Once the process is complete, the amount in the form of Wormhole XTAG tokens gets deposited into your Avalanche wallet on MetaMask.
**Step 7: (First Time Only) Adding Wormhole XTAG token address to MetaMask**
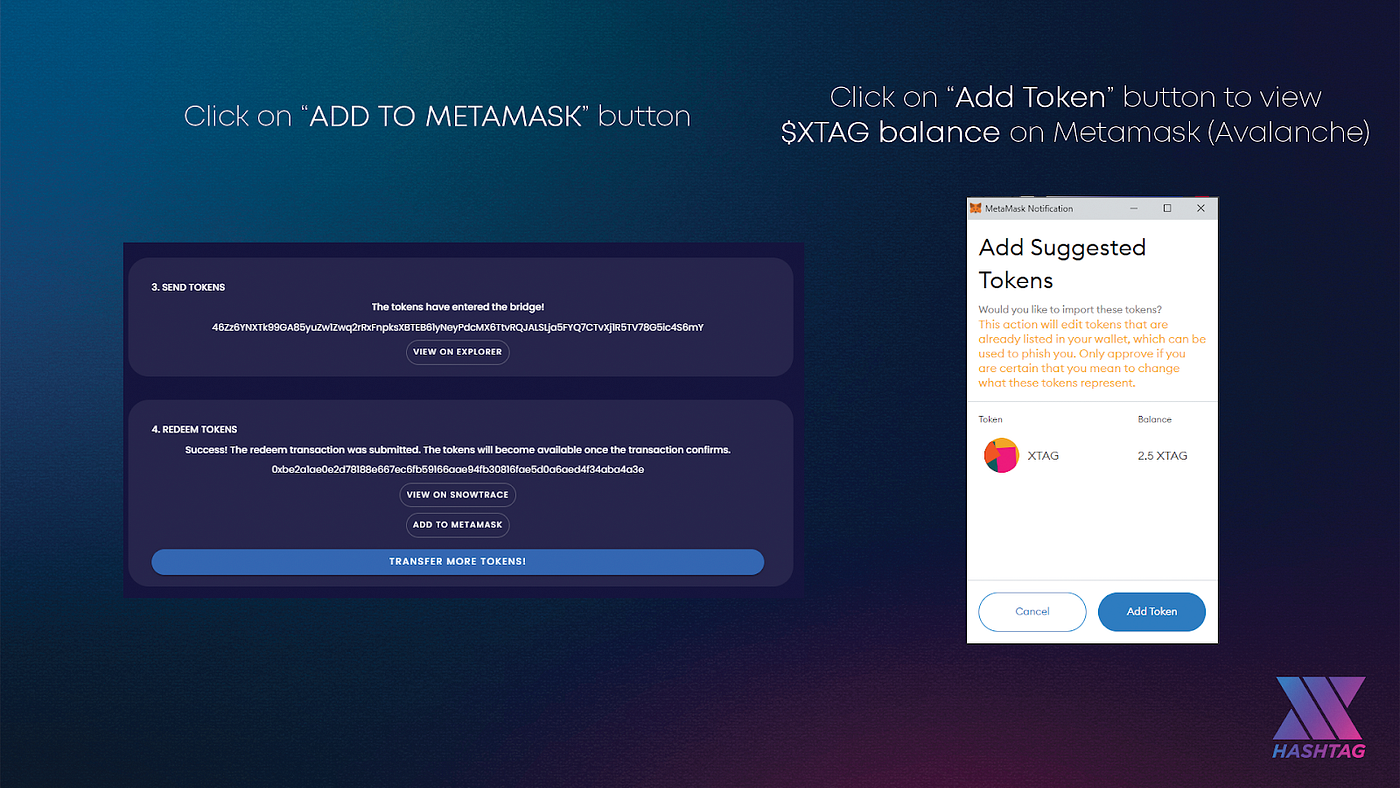
You would need to do this step only once during the initial transfer, to make sure the bridged XTAG tokens you have received show up on your MetaMask wallet. Simply press the Add to MetaMask option on the Redeem Tokens tab, and then press Add Token in the pop-up that appears.\
\
That’s it! You’ve successfully bridged over from Solana XTAG to Avalanche Wormhole XTAG.
### Part 2: Unwrapping the Wormhole to Native XTAG on Avalanche
\
Here's our detailed guide to how you can unwrap the Wormhole XTAG to Native XTAG -> \
\
The Native XTAG tokens you’ve received will continually have newer use cases as the solution is developed on the Avalanche Mainnet, which will be communicated by us through our [social channels](https://linktr.ee/xhashtag) from time to time.
# Liquid Staking XTAG on Avalanche
We’re super thrilled to be launching the xHashtag Mainnet on the Avalanche C-Chain. There are several features and use cases we’re working on, but for this article, we shall be focusing on how you can liquid-stake your XTAG tokens to earn a fixed APR for a fixed period on our Vaults.
Liquid Staking XTAG is pretty simple and you can participate even if you don’t have any prior experience. Just follow the steps detailed below, and you’ll be on your way to earning handsomely with XTAG through liquid staking and more!
**Note:** On staking XTAG on the xHashtag dApp, you receive liquid stake tokens called sXTAG (Staked XTAG) that are yield-bearing, thus earning you rewards in the background. sXTAG will be movable on the chain, with a number of use cases being developed, which would be communicated on the xHashtag [social channels](https://linktr.ee/xhashtag) from time to time. Please note that since sXTAG represents your stake in the vaults, you would need sXTAG in order to claim back your XTAG & accumulated rewards.
### **Steps to Liquid Stake XTAG on the xHashtag Mainnet on Avalanche C-Chain**
**Before you start the process of staking,** you would need to ensure you have XTAG available in your MetaMask wallet for staking on the Vaults to earn APR. You can acquire XTAG from the open market or bridge XTAG from Solana to Avalanche using the Wormhole Bridge (here’s how you can bridge -> )
**Step 1: Visit the xHashtag Mainnet App**
In order to stake your tokens, you would first need to access the xHashtag dApp by heading to .

**Step 2: Connect your MetaMask / WalletConnect wallet**
To see and transact with the available Wormhole XTAG tokens you have, you would need to connect your MetaMask / WalletConnect wallet by pressing the Connect button on the header.

Make sure you have chosen Avalanche Mainnet C-Chain as the default network. In case you haven’t done this, a Wrong Network button will appear. Click on it, press OK, and approve the request to add a new network. After this, press the Switch network button, and you should be ready for the next step.
**Step 3: Head over to the Vaults section**
Visit the [Vaults section](https://app.xhashtag.io/#/vaults) on the xHashtag dApp and select the XTAG vault of your choice. Press Approve and click on Confirm in your MetaMask popup.

**Step 4: Enter the amount you wish to stake**
Choose the amount of tokens you wish to stake (within vault-permissible max limits) and press the Approve button. On the pop-up that appears, press Confirm to complete the process of liquid staking.
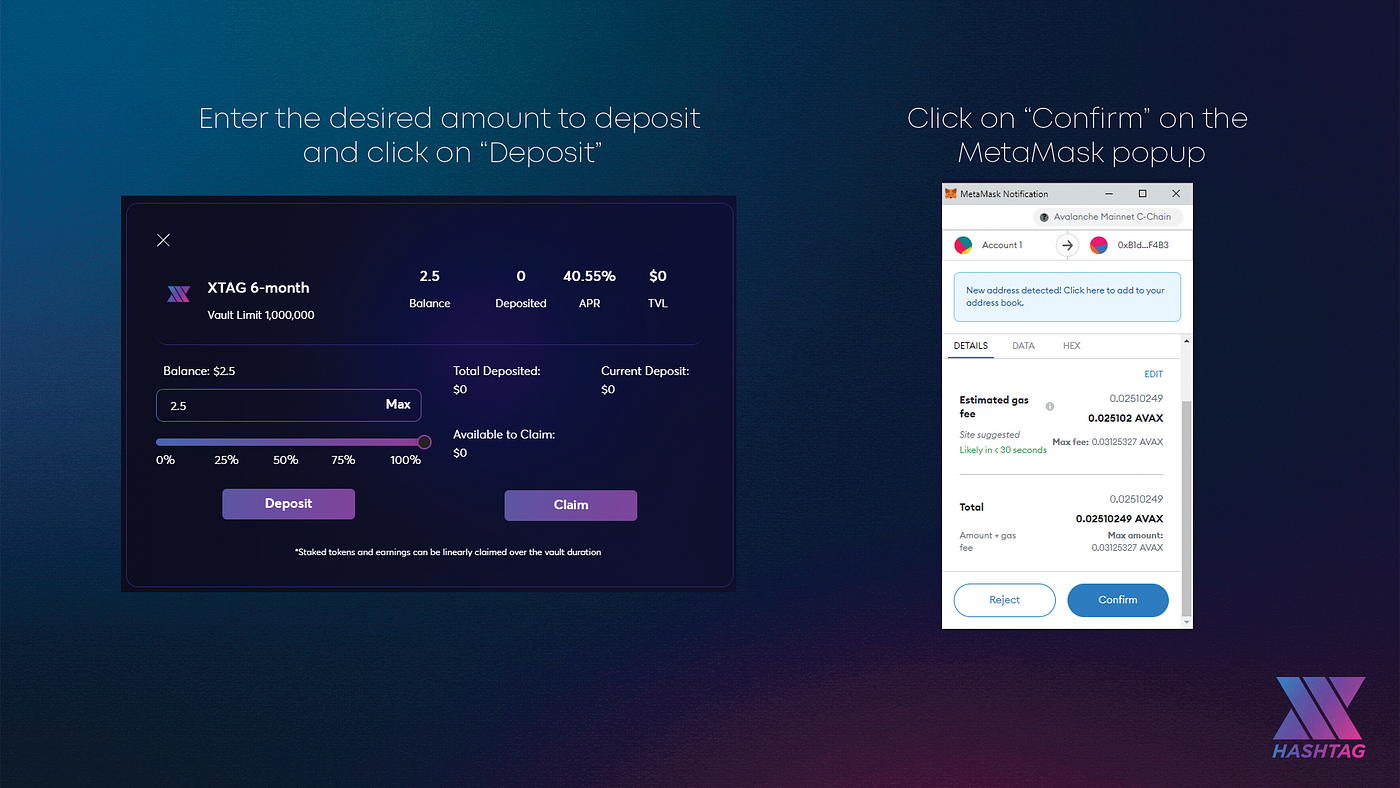
All details regarding the APR, available amount, deposited amount, and current balance would be visible once you click on the vault in which you’ve staked. As this is a single-asset staking, there would be no impermanent loss! Simply refresh the window to see the accrued rewards from time to time under the **Available to Claim** section.
**Step 5: Add the sXTAG contract address to your MetaMask / WalletConnect Wallet**
Once you have successfully staked into the vaults, you will receive an equivalent amount of sXTAG, which is a liquid stake token. To view this token in your wallet, however, you would need to add the sXTAG token contract address to your wallet:
Contract: 0x728f28819d0eFE48c82161ADd29f42b1eb5d8dbd\
Decimals: 6\
Ticket: sXTAG
**Claiming the Rewards**
The staked tokens and corresponding earnings can be claimed linearly over the duration of the Vault. The available amount to be claimed would be shown on screen and can be claimed by simply pressing Claim.
**Important Note:** The Single Asset Liquid Staking Vault has a fixed APR regardless of the number of users participating. The time period of staking is fixed too, but early withdrawal is possible based on the vesting period. Withdrawals and subsequent rewards are calculated on a pro-rata basis. So, for example, if you withdraw on the 10th day of a 40-day Vault, you will receive 1/4th of your initial deposit, plus 1/4th of the accumulated rewards.
***Upcoming Discounted Bond Marketplace:** On the* [*mainnet*](https://app.xhashtag.io)*, we would soon be introducing bonding in the coming weeks, where users can purchase various tokens at a discount. The bond purchase would have a minimum vesting period of 5 days (higher discounts would be applicable for a longer vesting period).*
We hope this guide was informative and insightful. If you have any questions, our active team can be reached through any of our [social channels](https://linktr.ee/xhashtag) for any assistance that you may need.
# Creating a No-Code Staking Vault in under 2 min
With xHashtag, you can now create a fungible token and launch a liquid staking vault, all in under 2 min. Let us walk you through what we’ve built.

**Step 1: Point the dApp to a Supported Chain (KCC/Avalanche/GateChain)**
Navigate to the xHashtag dApp by visiting the following links:
Mainnet: app.xhashtag.io\
Testnet: app-test.xhashtag.io

On the xHashtag dApp, choose the appropriate network. In this example, we chose KCC. But you have other options to choose from as well.

**Step 2: Creating a Token**
The dApp now opens with the ‘KCC’ network mentioned on top, and the default tab chosen would be ‘Campaigns’. Click on the ‘Launch Staking Vaults’ option on the left sidebar.

Here, you would see the option to ‘Create a Vault’, where you would need to complete steps like ‘Create/Add Token’, ‘Create Staking Vault’ and ‘Save Vault’.
For now, press the ‘Deploy’ button next to the ‘Create/Add Token’ option.
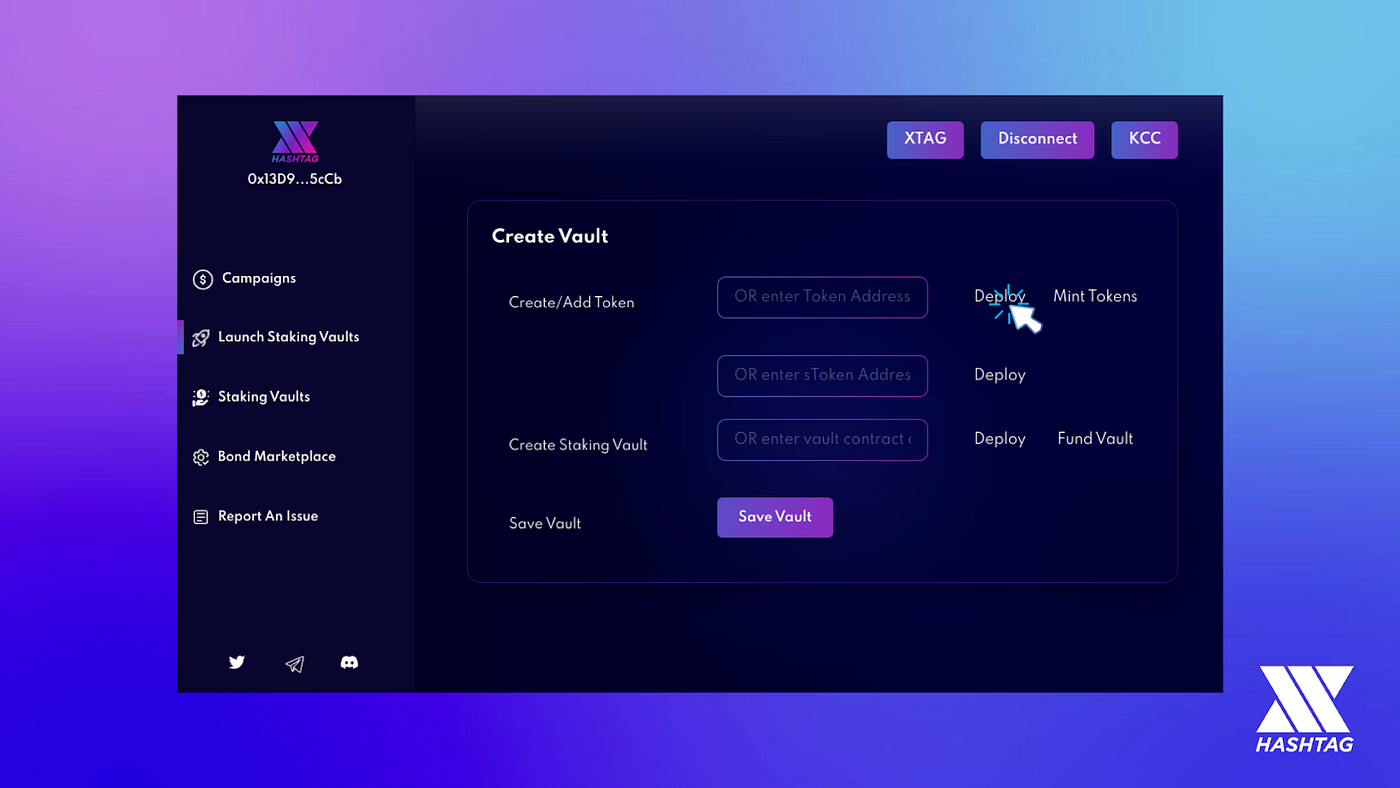
**Step 3: Enter details of your token**
The ‘Create ERC20 Token’ popup will now show up, where you would need to manually enter the ‘Name’ of the token you are creating and the ‘Symbol’. The token ‘Decimal’ field will be auto-populated with a default value of 18, and this can be modified based on your use case.
Once you have entered these details, press the ‘Create ERC20 Token’ button.

In the below example, we have named the token ‘KuShiba’, with the symbol ‘KSHIB’ and decimals set to ‘18’, the default value.

**Step 4: Approve the Token creation by paying the Gas fees**
On pressing ‘Create ERC20 Token’, you would require to pay a small amount of gas fees, denominated in $KCS. So, make sure you have sufficient funds to process the transaction on MetaMask.

**Step 5: Confirm all the details**
Once all the approvals have been provided and the token is created, you will notice that you have the contract address shown for the Deployed ERC20 Token. Save the contract address for future reference and simply press the X button to proceed.

**Step 6: Mint Tokens**
You will now be taken back to the Create Vault window, where you will have the option to ‘Mint Tokens’. Click on it.

Choose the number of tokens you wish to mint.
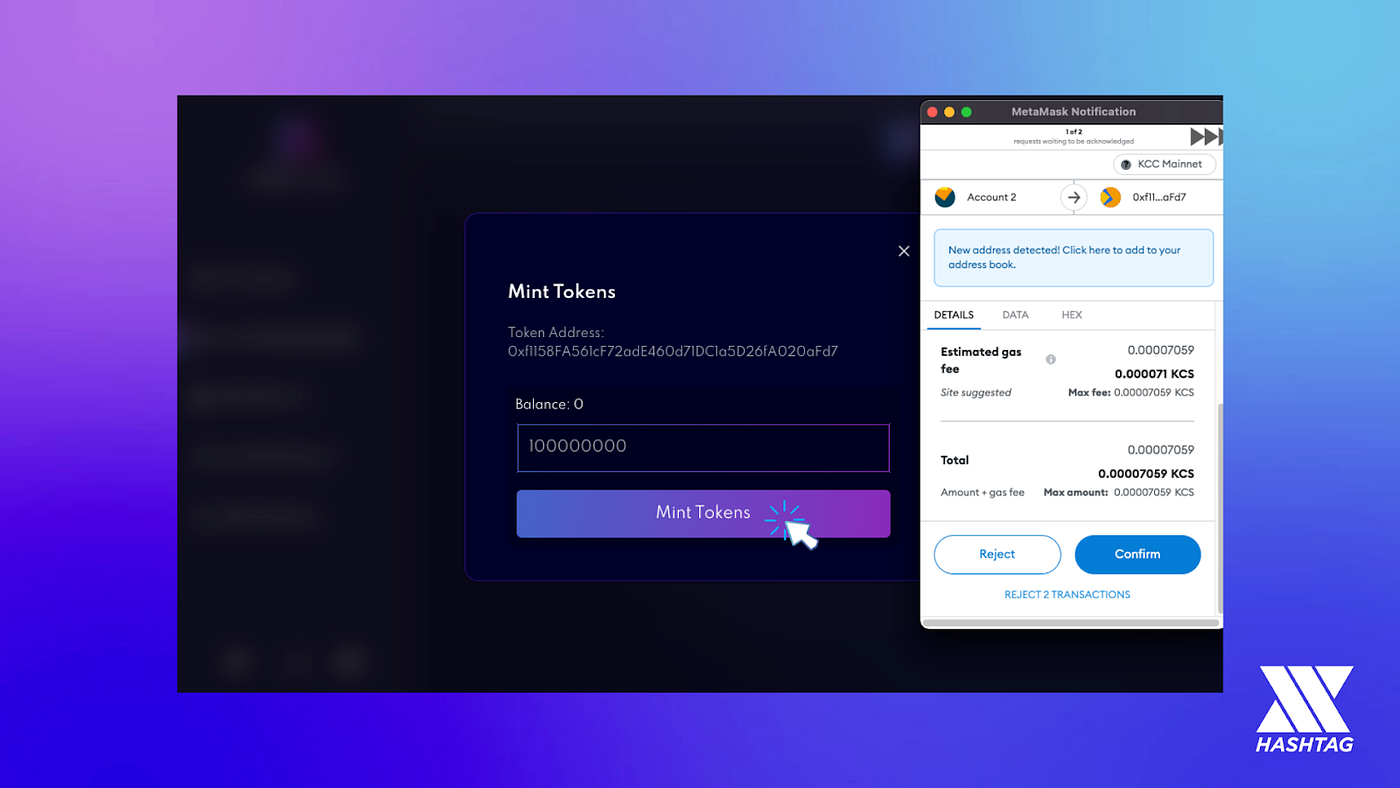
Another MetaMask popup will appear, press confirm to pay the necessary gas fees and mint the tokens.
**Step 7: Creating Liquid Staked Tokens**
Next, let’s deploy sToken, which is basically a receipt token that’s given to the users when they stake the actual token. In this example, when somebody stakes KSHIB, they’ll receive sKSHIB, a liquid-staked yield-bearing token that is transferable and earns yield in the staking vault.
sKSHIB can have various use cases such as DAO governance or as collateral for loans.
Now, let’s deploy by clicking ‘Deploy’ next to the ‘Enter sToken Address’ field.

The popup window will automatically fetch the token contract address from the first field. It’s possible to create a sToken without deploying a new token by pasting the contract address of your existing token in the first input field.

Again, approve the transaction on MetaMask by paying the requisite gas fees.
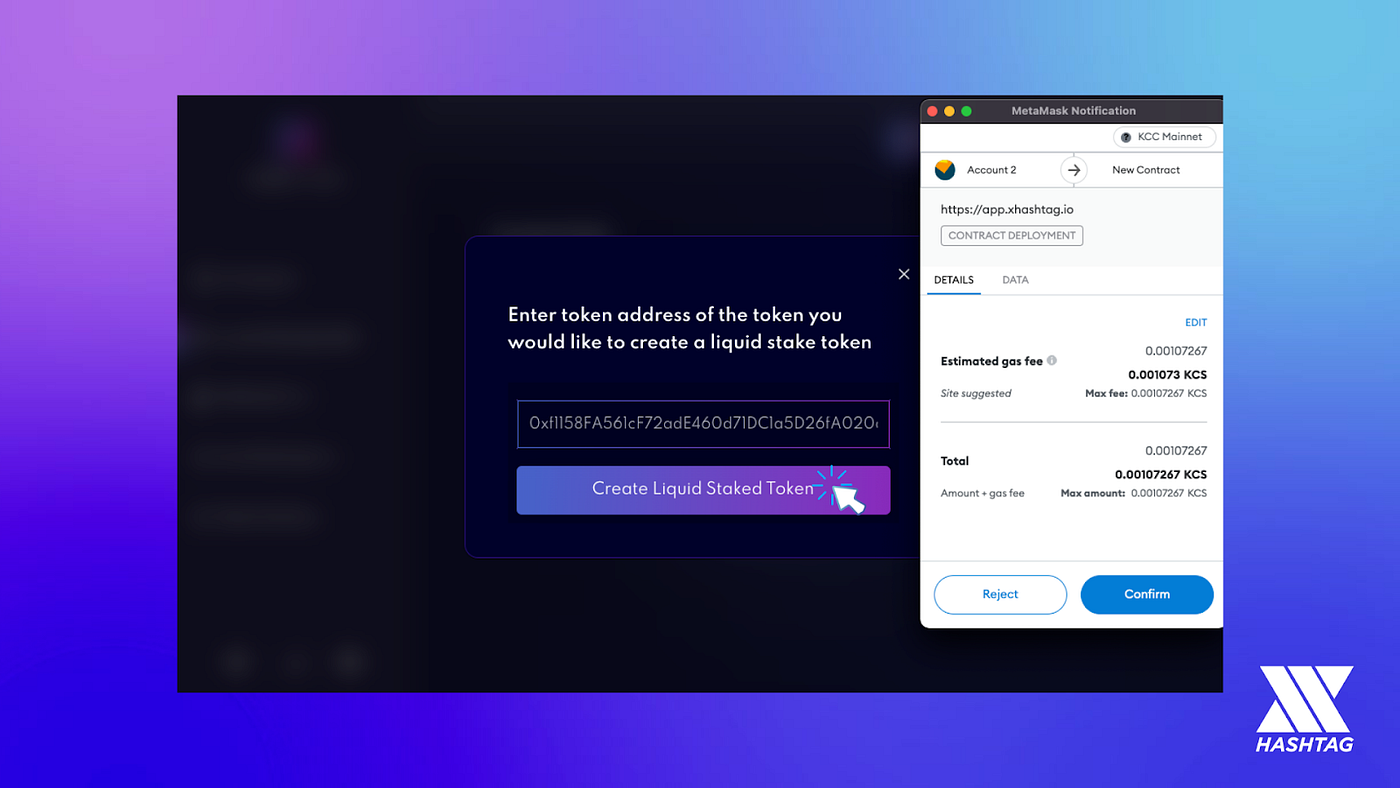
Once the process is complete, you will see a message below with the deployed liquid stake token contract address. Please save the contract address for future reference.

**Step 8: Creating the Liquid Staking Vault**
Once you see that the two token addresses are shown below, you may proceed to deploy the staking vault. Press ‘Deploy’ next to the ‘Create Staking Vault’ option.

You will get a screen that contains the contract addresses pre-filled, alongside 3 fields that you would need to manually enter.

**Step 9: Configuring the Staking parameters**
You will need to manually enter the ‘Vesting Period/Staking Duration’ in days, the ‘Fixed Interest Rate’ you wish to provide for the staking duration and the ‘Maximum Limit’ for your staking vault exceeding which the vault will no longer accept further deposits. Once you have entered these details, press ‘Create Staking Vault’.

Post this, you may receive 2 Metamask notifications, which you will need to accept. Again, ensure you have sufficient funds denominated in KCS for gas fees.
You will now see that the liquid staking vault has been created successfully, with the contract address displayed. You may now close this window by pressing ‘X’.

**Step 10: Funding and Saving the Vault**
You will now be back on the ‘Create Vault’ page, where you can see that the contract address has been updated next to the ‘Create Staking Vault’ option. You can now proceed to fund the vault by pressing the ‘Fund Vault’ button.

Choose the number of tokens you wish to add to the rewards vault in order to give out the fixed interest rate paid out during the vault duration. Approve any Metamask pop-ups that appear, and pay the necessary gas fees.

Once your vault is funded, you can now save it. Verify the details on the ‘Save Vault’ pop-up and press ‘Save Vault’.

Approve any MetaMask popups that appear, and once the process is complete, you will see ‘Done!’ next to the ‘Save Vault’ button.

**Step 11: Verifying the created Vault**
You can now proceed to the ‘Staking Vaults’ tab, by choosing it from the left sidebar. Now click on the newly created vault, to transact on that vault.
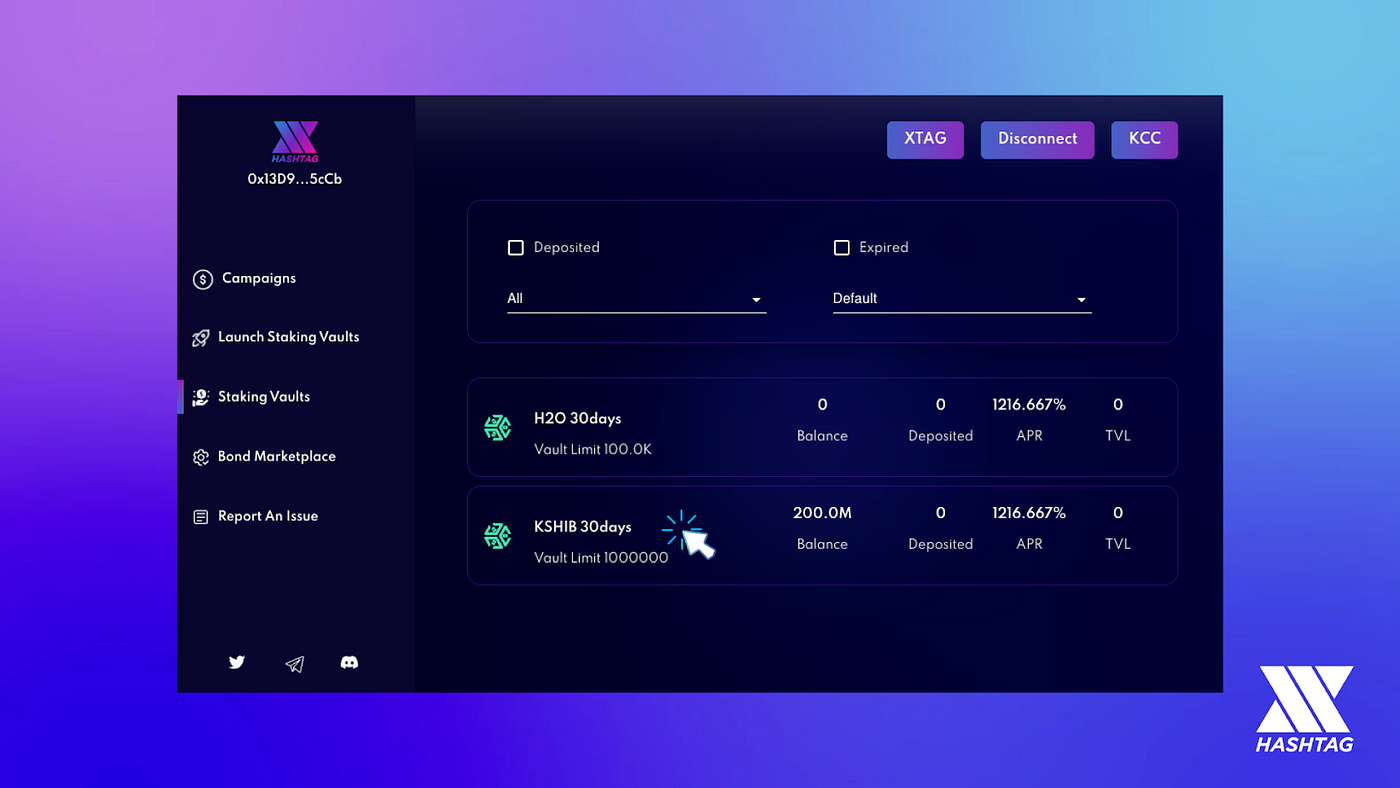
In this example of the KSHIB vault, the vault runs for a period of 30 days, with the mentioned APR. The vault limit is 1000000, so you may deposit any amount within that limit. All details are clearly displayed on the screen, for easy deposits and claims.
**Step 12: Funding and Claiming Deposits**
You first need to select the corresponding vault from the list, then the below pop-up appears.

To approve the vault deposit transaction, first click on ‘Approve’.

After the token access approval has been granted by the user, you can now deposit whatever amount you wish to deposit, within the mentioned vault limit. On entering the Deposit amount and pressing ‘Deposit’, you will be prompted with a MetaMask popup, accept it and you will see a couple of messages confirming the transaction as seen below.
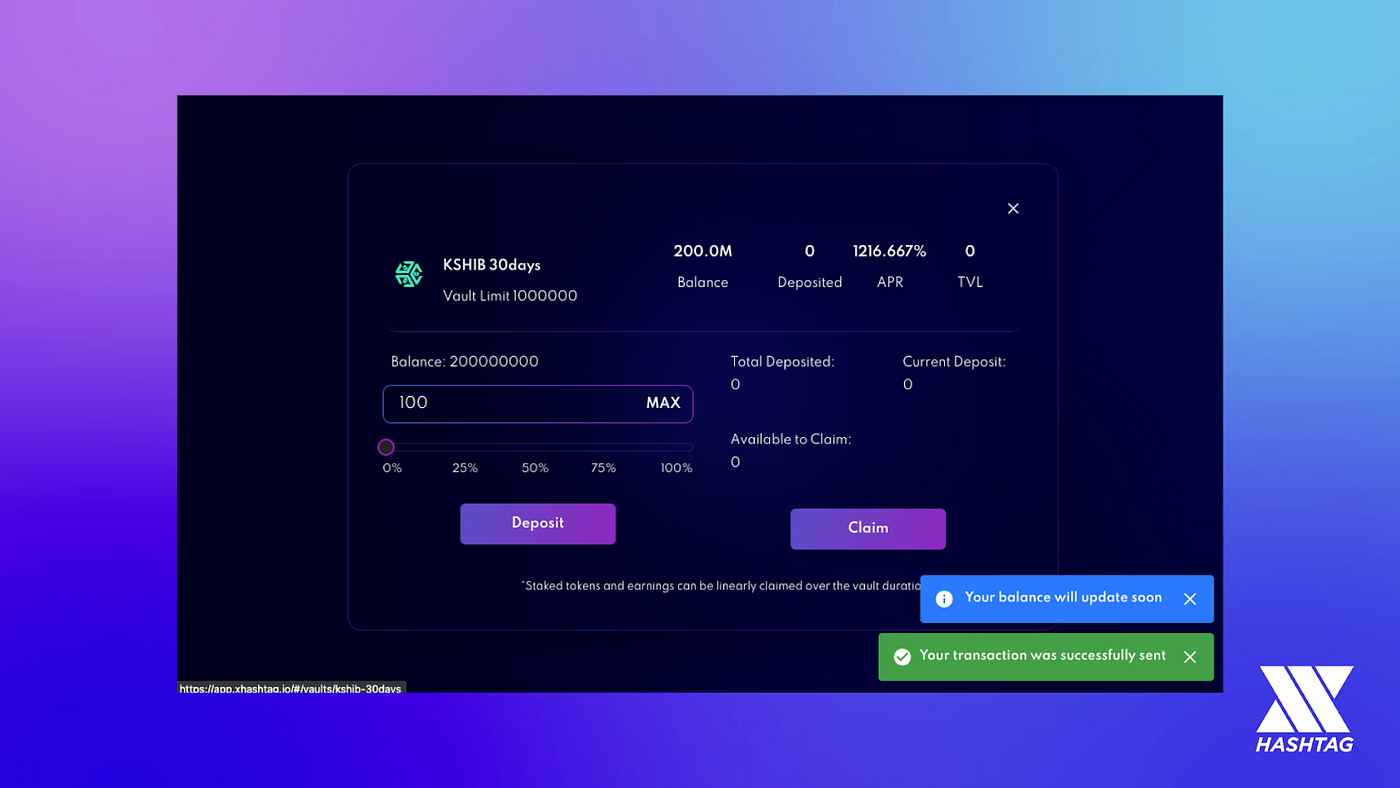
Once this is done, you can see your updated balance on the vault and the amount available for claiming. The claim process is as simple as the press of a button, and the accumulated earnings can be linearly claimed across the vault duration. That’s it!

# Frequently Asked Questions
Here are some of the most commonly asked questions about our platform:
**What is xHashtag?**
As a project that kick-started its operations in Mid-2021, xHashtag positions itself as a 360-degree Web3 Growth Automation Suite that helps Web3 projects scale and grow sustainably. We help projects bootstrap community, liquidity and treasury, through our unique features such as Automated Ambassador Program, Single Asset Liquidity Staking, Pre-Launch Community Building and Post-Launch Liquidity Supercharging.
**What are #communities?**
\#communities are exclusive groups for users who have staked a project's $tokens, which unlocks special tasks and enhanced rewards.
**What is $XTAG?**
$XTAG is our native governance token, which is a utility token that has real-world use cases including staking for governance, task prioritization and upgrade to reviewer status.
**What is the total supply of $XTAG?**
$XTAG has a total supply of 100 million. Further details can be found on the Tokenomics page.
#### How to buy XTAG?
A guide to buying XTAG is present [here ](/guides/how-to-buy-usdxtag)
**How reliable is the team at xHashtag?**
We have 10 members located across India, Singapore and the USA. Our product lead is an ex-US Airforce personnel with over 10 years of experience in building precision software, while our marketing head co-founded Trendrr, a platform that was taken over by Twitter. Our technical team has equally good experience in building scalable products that can gain adoption.
#### What is the easiest way to join the liquid team?
To join the team, you can participate in campaigns and giveaways. You can be part of the reviewer team if you have staked enough tokens and believe in the particular project.
**What are Soultags?**
Soultag (Plural Soultags) is a unique, non-transferable Soul Bound Token (SBT) that helps build up onchain reputation for an individual/soul, becoming a means of tracking the soul's reputation and achievements over time.
**How do we receive Soultags?**
Projects can choose to offer one or more Soultags to every unique individual participating in any task or activity either on-chain or off-chain, thus serving a dual purpose of being a proof of accomplishment for the individual and a proof of completion for the project themselves.
#### Are the soultags sellable? How do I sell them?
No, they are not sellable. These soultags are like a certificate to you and recognize your achievements on the blockchain. They are useful only to the owner of the tags, and that is you. You can explore [here](/the-basics/soultag-sbts) to make use of the soultags in the best way possible.
**Does claiming the Soultag SBT cost money?**
While the Soultags themselves are provided for free on completion of certain campaigns, there may be a small transaction fee involved to mint these Soultags, which would be mentioned during the time of claiming.
#### What is a Soulname?
Soul names are a humanly readable naming service that can map commonly used words, phrases, or terms to a crypto wallet address, which consists of obfuscated numbers and characters. Find out more [here](/the-basics/introducing-.soul-domains).
**How many tasks can xTaggers perform?**
Virtually infinite. As long as users fulfil the eligibility criteria, they can perform as many tasks as they wish from their dashboard.
**What are XDPs?**
XDPs are xHashtag Development Proposals, which essentially take a consensus from the DAO members to formulate and implement changes to the way xHashtag DAO functions.
**Do I need KYC to participate in the IDO?**
Yes, participation in the $XTAG IDO requires KYC as per SolRazr requirements. You can check their site for further details.
**How different are xHashtag's rewards when compared to airdrops?**
Unlike airdrops where rewards obtained for tasks are based on pure luck, every task performer on xHashtag gets rewarded in crypto.
**What is the PoS reward multiplier?**
Projects can additionally reward their #community users who have staked the project tokens in terms of reward multipliers for completed tasks.
#### How often are the contests/tasks taking place?
The start and end dates of each task are seen on the campaign page. They usually occur at least 2 or 3 times a month.
#### What are the “tasks” that are usually done during a campaign?
Tasks during a campaign include simple things like following, tweeting and retweeting a particular account on Twitter, joining the discord server, joining the telegram channel, staking and exchanging tokens on the project's platform etc. It may include all or only some of these tasks, or probably something different decided by the campaign creators.
#### How long does it usually take to announce the winners of tasks and Souldrops and the rewards to be given out?
The rewards distribution date is always mentioned on the campaign page. The announcement dates will vary for different campaigns.
#### How to claim the rewards?
Claiming rewards can either be through airdrops or through the Souldrops portal on the xHashtag dApp. The campaign rules will have a full explanation about the rewards. [Here is a detailed view to claim them on our dApp](https://medium.com/xhashtag/heres-how-you-can-grab-soul-name-using-xcred-5457a3b93509).
#### What is a High APY launch?
xHashtag facilitates a High APY launch for the projects on our launchpad with near-zero market float, allowing people to purchase tokens at a discounted price directly from the treasury through LP token or stablecoin-backed minting. This helps the project scale up rapidly at the start while giving users high APYs for their investment.
**Does a user need to have experience or invest to be an xTagger?**
Absolutely not! The platform is free for everyone who has a basic knowledge of the internet and willingness to work.
**What are the contract addresses for XTAG?**
$XTAG Contract Address on **Solana:** 5gs8nf4wojB5EXgDUWNLwXpknzgV2YWDhveAeBZpVLbp
$XTAG Contract Address on **Avalanche:** 0x06ba3e871ae3c14026d3e8a819fb3b5f31fef1d3
**What is the difference between sXTAG and wXTAG?**
sXTAG refers to Staked XTAG, the liquid staked XTAG tokens you receive when you stake your XTAG in our vaults. wXTAG refers to wrapped/wormhole XTAG tokens that you receive when you move your XTAG tokens from Solana to Avalanche using Wormhole Bridge.
#### Who are the xHashtag partners?
We have several partners including Kucoin labs, Exnetwork capital, ZBS capital, Kirin fund, Solrazr, Moonwhale etc. You can find all of them on our website [xhashtag.io](https://www.xhashtag.io)
#### On which platforms is xHashtag listed?
We are listed on KuCoin, Gate.io, LATOKEN and Raydium.
#### What are the plans for 2023?
We are planning several exciting upgrades. Integration with L2 chains, Aggregation of SBT from 3rd party issuers, Ethereum EIP 5192 integration for soultags, No collateral lending based on Soulrank, Launching Soulrank dashboard, Layer 2 R\&D and Testnet, Integration of Web2 reputation, Support for cross-chain Souldrops, and many more to come. You can find the full updated roadmap on our website [xhashtag.io](https://docs.xhashtag.io/tips-and-tricks/www.xhashtag.io).
*If you have any additional questions apart from the above that you require answers from, join our helpful global telegram community for fast and prompt help from our community managers and fans. If you still have any queries, do not hesitate to reach out to us via email.*
# Glossary
Common terms you would come across when reading this document, participating with xHashtag or in the web3 domain in general.
## A
**Airdrops:** The distribution of tokens directly to users' wallets by crypto projects often for meeting specific participation criteria (i.e., being active in a community, holding a specific number or type of token(s), holding a token for a certain period of time).
**APR: Annual Percentage Rate** is an ordinary interest rate applied to the principal amount of an investment or a loan. It doesn't take into account the concept of compound interest
**APY: Annual Percentage Yield** is a measure of interest applicable to an investment or loan that takes into account the compound interest.
**Arbitrum**: A layer 2 scaling solution for Ethereum that was founded in 2019. It utilizes ETH to pay for transaction fees and its networks include Arbitrum Mainnet and Rinkby Testnet
**Avalanche**: A layer 1 blockchain founded in 2020 built on Proof of Stake (PoS). AVAX is the native token. Its network includes the mainnet and Fuji.
## B
**Blockchain**: A distributed database that is shared among computer network nodes. As a database, a blockchain stores information electronically in a digital format.
**Bridge**: A bridge connects two chains and allows NFT, tokens, and other arbitrary data to be transferred between them.
## C
**Campaign:** A process/ event of conducting promotions and advertising by the company of a brand or of themselves.
**Collateral:** An asset that is used as a guarantee that someone will repay a loan that he or she took.
**Credentials:** These are unique tokens which can be stored digitally as a kind of certificate of performance by an individual. These are non-tradable and verifiable by the issuer.
**Crypto:** A digital asset that is encrypted using cryptography and is built on blockchain technology.
## D
**DAO**: Decentralized Autonomous Organization, sometimes called a decentralized autonomous corporation, is an organization represented by rules encoded as a computer program that is transparent, controlled by the organization members and not influenced by a central government.
**dApp**: A decentralized application is a computer application that runs on a decentralized computing system. DApps have been popularized by distributed ledger technologies such as the Ethereum blockchain, through the use of smart contracts.
**DeFi:** Decentralized finance is a blockchain-based form of finance that does not rely on central financial intermediaries such as brokerages, exchanges, or banks to offer traditional financial instruments. Instead, it utilizes smart contracts on blockchains (e.g., Ethereum).
**Decentralized**: No unique owner, operator, or single point of failure.
**DEX:** Decentralized Exchange, an on-chain program for buying, selling, trading, or swapping on-chain assets.
## E
**ERC20**: Ethereum Request for Comments is an application-level standard application level standards for Ethereum (e.g. ERC-20 is a common protocol for deploying fungible tokens on Ethereum).
**Ethereum:** An open-source and decentralized layer 1 blockchain, which was founded in 2015. Its native cryptocurrency is ETH, which is used for staking and paying transaction fees.
**EVM:** Ethereum Virtual Machine defines the rules for computing on Ethereum, enabling developers to launch and execute smart contracts.
## F
**Free economy:** A decentralised economy with a minimum of governmental or organizational restrictions. In web3 this can be similar to DAOs where the members/ users freely make economic decisions.
**Fungible Token:** An on-chain asset that has a quantity greater than 1 and those assets have no discernable or unique traits that differentiate one from another.
## G
**Gas fee:** The cost associated with the computational effort required to perform a transaction on a blockchain.
## I
**ICO:** Initial Coin Offering or Initial Currency Offering is a type of funding using cryptocurrencies. It is often a form of crowdfunding, although a private ICO which does not seek public investment is also possible.
**IDO:** Initial DEX Offering is an ICO that is completed on a decentralised exchange.
## L
**Layer 1:** A main network that refers to a blockchain that defines protocol rules (e.g. Bitcoin, Ethereum, Solana).
**Layer 2:** A program or technology that exists on top of a Layer 1 blockchain, often created to accomplish something that may not be easily achievable by its parent layer 1 (e.g. increase speed or functionality).
**Leverage:** Borrowing assets from exchanges to amplify your crypto trading capacity
**LP token:** It is a token given to users who loan their crypto to a liquidity pool. This represents a user's share of the pool and can be used to redeem the original tokens.
## M
**Metaverse:** A network of 3D virtual worlds.
**Minting:** To manifest new tokens onto a blockchain.
## N
**NFT**: An on-chain asset that has a quantity of 1, which has unique traits that differentiate it from any other.
## O
**Off-chain:** Here some of the work from a blockchain system is transferred to a third party which helps in validating and authenticating transactions and then later integrates it back into the blockchain.
**On-chain:** This refers to a transaction/task that is carried out on the blockchain network from start to end.
**Opensea:** It is a marketplace to buy and sell NFTs.
## P
**Polygon:** A layer 2 blockchain founded in 2020 built on the Proof of Stake (PoS) consensus mechanism. The native token on Polygon is called MATIC and is used for staking and paying transaction fees. Its networks include the Polygon mainnet and Mumbai testnet
**Private Key:** A private key is a secret number that is used in cryptography, similar to a password. In cryptocurrency, private keys are also used to sign transactions and prove ownership of a blockchain address.
**Proof of Authority:** PoA, In PoA-based networks, transactions and blocks are validated by approved accounts, known as validators.
**Proof of History:** PoH, A consensus mechanism that relies on an internal clock to track the passage of time.
**Proof of Stake:** PoS, is a cryptocurrency consensus mechanism for processing transactions and creating new blocks in a blockchain.
**Proof of Work:** PoW, is a form of adding new blocks of transactions to a cryptocurrency's blockchain. The work, in this case, is generating a hash (a long string of characters) that matches the target hash for the current block. The crypto miner who does this wins the right to add that block to the blockchain and receive rewards.
**Public Key:** A unique cryptographic public identifier for an on-chain account.
**Protocol:** Basic sets of rules that help in sharing data between computers. In crypto, they establish the structure of a blockchain and help them to be decentralized
## R
**Reputation:** It is a digital representation of an entity's standing or status in a specific domain, that is verifiable and helps the user create their own public identity to be used for future work.
**Rewards:** Rewards in web3 are tokens given away to the users to promote their brands and track their reputation.
## **S**
**Smart contract:** On-chain programs with pre-defined rules to govern how users and tokens interact with the program when certain conditions are met.
**Solana:** A layer 1 blockchain founded in 2020 built on a concept called Proof of History (PoH) to enable scaling and affordability. Its native token is called SOL. Its network includes Mainnet-Beta, Testnet, and Devnet
**Stablecoins:** Cryptocurrencies where the price is designed to be pegged to a cryptocurrency, fiat money, or to exchange-traded commodities.
## **T**
**Testnet:** It is a safe environment for testing a project's performance before committing it to the mainnet.
**Token:** Virtual currency token or a denomination of a cryptocurrency. It represents a tradable asset or utility that resides on its own blockchain and allows the holder to use it for investment or economic purposes.
**Tokenomics:** The economic details of a token project, including information about supply, inflation/deflation, or other mechanisms that may impact the value of an asset in the future.
## **U**
**USDC:** A digital dollar which moves at internet speed and is running on many blockchains around the world. It is issued by the CENTRE consortium.
**USDT:** A crypto-established stablecoin pegged to the US dollar and backed by Tether's services.
## **V**
**Vetting:** Investigating an individual or a company before trusting, investing or borrowing from them
**Vaults:** It can receive crypto like a normal asset balance in your account, but can also prevent stored crypto from being immediately withdrawn by adding optional security steps.
## **W**
**Wallet:** A crypto wallet is used to sign transactions and store the private keys that are used to interact with the blockchain network. A wallet contains a public key (this is the wallet address) and the private keys needed to complete and sign transactions. Control of the private key means control of the assets.
**Web3:** Web3, also known as Web 3.0, is an idea for a new iteration of the World Wide Web that incorporates decentralization and self-custody of assets. It is often contrasted with Web 2.0, wherein data and content are centralized in a small group of companies sometimes referred to as "Big Tech".
**Whitelist:** Pre-approved list of users or wallets that are allowed to participate in some type of event (e.g., mint a new NFT or participate in an IDO).
**Wormhole:** It is a bridge that efficiently facilitates moving digital assets from one blockchain to another.
# Social Links
Follow and Join us to stay updated on the latest developments
Twitter:
Telegram: Announcements:-
Telegram: Discussion:-
Medium: [https://medium.com/xhashtag](https://www.google.com/url?q=https://medium.com/xhashtag\&sa=D\&source=editors\&ust=1637266011673000\&usg=AOvVaw1BkHfTfwjc25l9VBB8CP-L)
Discord: [https://discord.com/invite/XBvvmuCTgY](https://www.google.com/url?q=https://discord.com/invite/XBvvmuCTgY\&sa=D\&source=editors\&ust=1637266011673000\&usg=AOvVaw0hKfy95OGp9w8klXAJDhpS)
Website: [https://www.xhashtag.](https://www.google.com/url?q=https://www.xhashtag.io/\&sa=D\&source=editors\&ust=1637266011674000\&usg=AOvVaw0miFnJzhFYt902kiT0H3Hy)[ai](https://xhashtag.ai)